Showing posts with label From Drab to Fab. Show all posts

Thursday, December 13, 2012

Snowman Gift Box

Need a cute little gift box to hold a small gift or a gift card? This little snowman gift box is perfect, in fact, he's a gift himself! 


To make this cute snowman, I started off with a plain wooden gift box from Michael's. It was only a dollar. 


I painted the box white using spray paint. Then I made him a little black hat out of black cardstock, adding some red and white polka dot ribbon to the brim of his hat. Then I added button eyes and drew on an orange "carrot" nose with an orange sharpie. I punched out some black cardstock circles using a hole punched and mod podged those on with sparkle Mod Podge then I gave the whole box a coat of sparkle Mod Podge. 


Isn't he cute? He's the perfect size to hold a small gift, a gift card, or even a bunch of candy canes! 


Linking up to the parties listed in my sidebar
and 
Visit thecsiproject.com

Thursday, July 12, 2012

Another Dollar Store Basket Makeover


Well, I have another one. Sometimes (like now!) when I have injured my back (again!) and am on "light bed rest" I still want to craft so I made this basket to put craft supplies in so I could do some couch crafting. 


I started off with a teal basket from the Dollar Tree, a roll of black and white polka dot ribbon, and a roll of black ribbon. All I did was weaved the ribbon in and out of the holes in the basket. 

Then instead of tucking the ends under like I did with the other basket, I just tied it off in a double knot. Before I made the knot, I did seal the ends of the ribbon with a lighter so it wouldn't fray. 

And now, I have a cute little basket that is the perfect portable craft kit! 

These would be cute for birthday gift baskets and even cute for a Christmas gift basket! 

(Linking to the parties listed in my sidebar)

Friday, June 29, 2012

Patriotic Tree

I started off with this....
a little pink tree I bought at the Dollar Store back before Easter.
(You may remember I dolled this same tree up for Valentine's Day.)

I made some stars out of different types of red, white, and blue scrapbook paper with twine or ribbon as hangers, bought a 97 cent patriotic bucket at WalMart, and added some shredded tissue filler and came up with this:
Cuteness!


(Linking up to the parties listed in my sidebar)

Friday, June 15, 2012

Patriotic Candle Holders

This is an under fifteen minute, thrifty, green, and patriotic craft perfect for 4th of July decorating! 


You will need:

3 jars (I recycled some pasta sauce jars.)

scrapbook paper (patterned and solid)
tape
pop dots or dimensionals
star punch
candles (I use the battery operated tea lights.)

What you'll do: 
1. Cut your scrapbook paper to fit your jars and tape it in the back. I use tape so I can easily remove it and use the jars for something else after the holiday is over. 
2. Cut out the letters USA. I used my Silhouette machine to do this but you could use a stencil or even use sticker letters. 
3. Adhere the letters to your jars with pop dots. 
4. Punch out some stars with the star punch and adhere them to the letters. 
5. Pop in your candles.


And there you have it!
I have these on my mantel but they would also look adorable on a front porch as well! 

(Linking to the crafty parties listed in my sidebar)


Tuesday, June 12, 2012

Dollar Store Basket Makeover

I needed a basket for a for a baby gift and I wanted something fun and cute that would match the decor so that it could be used for storage in the baby's room later. 

I found this basket at The Dollar Tree. It's kind of cute as is. But I knew I could make it cuter. 

So I gathered the basket, some scissors, my hot glue gun, and some ribbons that I knew would match the baby's bedding.

I simply weaved the ribbon in and out through the holes in the basket. Just make sure it is straight and doesn't turn and keep weaving it all the way around. 

When you get all the way around the basket, you will just tuck the ribbon into one of the holes and glue it down on the inside of the basket. 

Do that for all the rows on the basket and you'll have an adorable basket! You could use all the same kind of ribbon or use different contrasting ribbons as I did. 


Then just fill up your basket with whatever! I added some baby socks, onesies that I decorated, bottles, and some other baby necessities. Then I covered the basket in cellophane, tied a bow with some of the left over ribbon, and hung a little ducky from the bow and voila! 

An adorable baby gift in a cute basket that once started out as a plain ole' boring basket. 

The sky is the limit with this project - you could make some that match your child's bedroom decor for storage, you could use fun colors and make a birthday basket, use college colored ribbons and make a survival kit for someone heading off to school in the fall, etc! 

Linking up to the parties listed in my sidebar 

Tuesday, May 29, 2012

Baby Onesies

I don't know what exactly it is about creating baby onesies but I love doing it and recently created several for J's best friend and his wife who just had a baby boy about a week ago. 

I bought a package of plain boring baby onesies and went to town decorating them. I used designs I purchased from the Silhouette store and designs I made myself in the Silhouette software. My Silhouette machine cut all the designs out of freezer paper. I then ironed the freezer paper on each onesie painted them. 


(To learn more about how to freezer paper stencil, check out this post.)

The baby's name is Austin. This one was a little difficult because of the layering. In hindsight I should have left a space for the plane and not layered the plane on top of the cloud as the paint didn't cover the cloud very well.

Austin's parents are huge Clemson fans too.

I just love onesies with ties.

Simple whale silhouette


These became a very cute and personalized but inexpensive gift.

(Linking to the crafty parties listed in my sidebar)

Wednesday, May 23, 2012

Year End Teacher Gifts

So for this year's end of the year teacher gifts we took some simple but practical and useful plastic cups with straws perfect for summer and dressed them up just a little bit. 

I wanted to get the teal cups - Noah wanted to get orange and since they were for Noah's teachers, as you can see, he won. We were telling my Mom about it and she had the suggestion for the tag which Noah found hilarious so we went with it. 

I threw together a quick tag and cut it out with my large circle punch, punched a small hole in it, and tied it on the straw with white curling ribbon. Then Noah added 4 individual packs of lemonade mix to each cup and they  were finished! 

Cute + Play on words + Inexpensive + Simple = Perfect Year End Gift for Fabulous Teachers! 

PS. If you'd like the tag (you aren't limited to teacher gifts with it since it doesn't actually mention teachers) just click the image below and then right click and save it to your computer. 


Monday, March 5, 2012

A New Quote Box

I love quotes. You may have gathered that now by my Quote of the Week posts every Sunday. Quotes inspire me, give me hope and a fresh perspective, and sometimes make me feel less alone. 

I have a quote box which is basically just a recipe box that is filled with index cards that have hand written quotes on them sorted by subjects. I’m sure there is a more high tech way to keep up with quotes I like and I do pin some that I come across but there is something I just love and enjoy about this old school way of keeping up with meaningful quotes. 


I’ve had my current quote box for quite awhile and it was starting to fall apart and wasn’t looking so good so I decided it was time for a new one. 


I spotted these plain, boring wooden recipe boxes at Michael’s and knew it would be the perfect quote box once I decorated it. I chose to do it in teal, black, and white so that it would match my creative studio which is where it will live. 


I painted it teal and then decopauged on some black and white scrapbook paper. I cut the word "quotes" in teal with my Silhouette and glued those on. I completed it with some ribbon and a teal flower. I love how it turned out! 


I decided it also needed some new dividers so I traced the old dividers and created new ones using different black and white patterned scrapbook paper.


Now I have a beautiful box to store meaningful quotes!

You could totally do something similar for recipes or even addresses and phone numbers but just change the colors to match your decor and style!

(Linking to the parties listed in my sidebar)

Monday, January 9, 2012

Chalkboard Tins

I guest posted this project over at The CSI Project blog last week for their weekly challenge which last week was creating something useful out of leftover Christmas items


These Activity Chalkboard Tins are created using tins that you may receive over the holiday season filled with treats. By revamping these tins using chalkboard paint, you will create a useful activity tin that you can keep in the car for road trips, grab and bring in a restraunt, or even pull it out and take it in church to occupy your little ones - and since I used chalkboard paint, they can even draw (with chalk of course) on the lid of the tin!

To get started, you will need:
leftover Christmas tins (or look for some on super clearance)
chalkboard spray paint
chalk
stickers and/or ribbon to embellish the tin
crayons, paper, stickers, small toys, and tissues to fill the tin and occupy your kiddos

What You'll Do:
1. Clean the inside and outside of your tin. I was a bad spray painter and did not prime this first because I was short on time. Typically, I try and prime all projects first. Once you've primed, spray paint the tin with your chalkboard paint. You need two coats to create the chalkboard finish.

2. Let your paint dry and then follow the instructions on the bottle to "break in" the paint. I just rubbed the side of a piece of chalk all over the tin, wiped it off, and it was good to go!

3. Next comes embellishing! My son loves all things baseball so I used baseball stickers on the side of the tin. I did a girly tin using rock star and diva themed stickers. I did not have any problems with the stickers adhering to the tin as is but if you do, you could add a little glue to the back of the stickers. On the girly tin, I also glued ribbon on the edge of the lid of the tin.

I purposely did not embellish the lids of the tins so that kids can use the chalk and draw on the lid.

3. Fill the tins with fun things for your kiddos such as small toys, bubbles, stickers, crayons, chalk, etc. Don't forget some tissues so they can wipe off their drawings and draw again later!

I hope you enjoy making this project and that your kiddos enjoy playing with it!

(linking up to the parties listed in my sidebar)

Tuesday, August 23, 2011

From Drab to Fab: Teal and Damask Tray

So I had a plain wooden tray lying around in my stash and decided to fix it up and use it to hold some of my supplies in my creative studio.

I started off with a plain wooden tray. Pretty Drab!


I painted it the same shade of teal as my dresser. Then I covered the bottom of the tray with the same black and white damask wrapping paper that I used on the back of my bookshelves.

Love the end result!

(Linking up to the parties listed in my sidebar)

Tuesday, August 16, 2011

Bookcase Makeover

I'm so excited to finally share my bookcase makeover for my creative studio! Instead of holding books, this bookcase houses a lot of my craft supplies in an organized fashion. 

I've actually had this bookcase for years and it's been all sorts of colors (white, blue, brown) but it was starting to look kind of bad and definitely time for a fresh coat of paint. I'm almost embarrassed to show you the before - it was MESSY! (I promise, it wasn't always THAT messy!) But I think to fully appreciate the new and improved bookcase, you must see the before.

So, once I cleaned off the bookcase, I sanded the bookcase down and then I painted it with two coats of flat black paint. It looked a million times better at that point - but I wanted to do something different - I wanted to add paper to the back of the bookcase. (Like this pretty cabinet!)

I'm using different black and white prints in my creative studio and I found a big roll of black and white damask printed wrapping paper at Hobby Lobby that ended up being three bucks for 50 square feet with my coupon.


I was actually nervous to paper the inside of the bookshelf. I was scared I'd mess up or it wouldn't be straight or something. But, I decided to go for it - if I did one shelf and didn't like it, I knew I could just rip it off, sand the heck out of it, and repaint it.

The wrapping paper had a grid on the back of it. This made it SO much easier! I used spray glue to adhere the wrapping paper to the back of the bookcase. I liberally sprayed where I needed the paper to go then I started at the top of that particular shelf and worked my way down, smoothing it straight as I went. It was so much easier than I thought it would be and I LOVE the outcome and am seriously having to restrain myself from running around and papering all the bookcases in my house.

Ok, enough teasing.... Ready to see the end result?

Ta-da!

Here's some closer looks.....


Everything is sorted and in different baskets an all organize now! Boy, does it feel good to have it all organized! I have the ribbon all sorted by color - I even rolled up all the ribbons and secured them with straight pins. My Momma would be so proud!  All the baskets actually came from the Dollar Tree. I wasn't looking for baskets there but when I saw them I knew they'd be perfect and you can't beat the price. 

I made the labels using my Silhouette machine and adhered them to the baskets with glue dots. 

The large shelf houses my paper storage boxes. (Go here to see how I made them.)
I sorted some of my embellishments into little jars that I already had. 

More miscellaneous crafting supplies sorted into baskets. 
And the very bottom shelf holds my large paper trimmer, crop-o-dile, and other necessities. It's not as pretty as the other shelves so I may try putting those things in the closet. 

Love it! 
Pretty and organized!

Linking up to the linky parties listed in my sidebar 
and 
Visit thecsiproject.com

Tuesday, July 19, 2011

Dresser Makeover

I have an old dresser in my creative studio which houses different craft supplies including my Silhouette machine. Once I chose my new color scheme I knew I would need to paint the dresser to match. 


Here's the before picture................


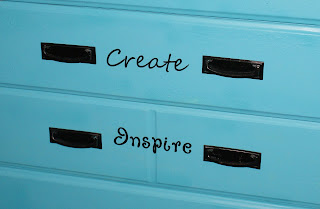
After sanding and priming, I gave her a coat of teal paint. I took the handles off and sprayed them black. But it still needed something else so I decided to cut out different inspirational type words out of black vinyl using my Silhouette machine and added those to each drawer. 


And now it looks like this............


Here's a couple of close ups of the drawers......


I lined the drawers with black and white patterned paper. I just put a light layer on Mod Podge in the drawer, laid the papers down, smoothed out any wrinkles, and added a light layer of Modge Podge so now the inside is pretty too.


I LOVE how it turned out! 


(Linking to the link parties listed in my sidebar)