Showing posts with label Tutorials. Show all posts

Thursday, December 12, 2013

Santa-tizers for Nurses

Noah, my son who has cerebral palsy, epilepsy, and autism) gets 15 hours of having a PCA (personal care aide) a week. We have had some not so great PCAs in the past several months and I'm kind of not the nicest client when it comes to the not so great aides being in my home and taking care of my son so I decided to make a little RAK (random act of kindness) for three nurses who work in the office and have to deal with my phone calls. 

Here's what I came up with......


It holds a little bottle of hand sanitizer from Bath and Body Works. What nurse (even one who primarily works in an office) doesn't need a little hand sanititzer? I crafted up these hand sanitizers to look like Santa's pants. The perfect combination for any nurse in December! 


Most of my supplies came from Consumer Crafts. They have great prices, arrived quickly, and were packaged well. 

You will need:
Martha Stewart scoring board (I have been wanting one of these for a long time and LOVE it. Review coming soon!) 
Cello Bags
Small Bottles of Hand Sanitizer (mine came from Bath and Bodyworks)


What you will do: 
1. Cut your red cardstock to 3 1/2 inches wide by 5 1/2 inches long. 

2. Using the Martha Stewart scoring board, score the paper on the long side at 2 1/4 inches and 3 1/4 inches. Flip it to the short side and score at 1 inch and 2 1/2 inches. 

3. Cut tabs on the long side where the score marks meet. 


4. Use the red tape, to adhere the two sides to one another to make a little box.
5. Add the black ribbon with some of the red tape. Cut a small yellow square for Santa's belt and then cut the middle out using a craft knife, adhere to the black ribbon also using a bit of the red tape.
7. Place the bottles of hand sanitizer in each of the little boxes. 

8. Package in a cello bag. Using the red and green Baker's Twine, tie on a jingle bell or two to embellish and then tie a bow. 


You now have cute little hand sanitizer holders ready to surprise whomever deserves surprising in your life! 


Disclaimer: I was compensated by Blueprint Social and Consumer Crafts for this post but all opinions and views are my own.

Monday, December 9, 2013

Snowflake Pin/Ornament

This is another one of my super easy because life, a kid, a husband, a house, and a bad back get in the way at the holidays - type of projects!

A cute little snowflake face! You can make it as an ornament or turn it to a pin and wear it proudly.


To make your own, you will need: 

White Cardstock
Snowflakes (I used wooden ones purchased at Hobby Lobby but you could cut them with your Silhouette too!) 
Glue (I used E-6000) 
Bakers Twine or Pin Back (depending on whether or not you are making a pin or an ornament)
Mod Podge Dimensional Magic 
Snowy Face File (I created this file myself in the Silhouette Studio Software and I'm sharing it here. While I sized this to fit the snowflakes I was using, you can re-size it to fit yours.)

How to make your own: 
1. Using the print and cut feature in the Silhouette software, cut out as many faces as you need. 

2. Dab a little glue in the middle of the snowflake and glue on the snowy face. 

3. Once it is dry, put on the Mod Podge Dimensional Magic (MPDM). Start with the center of the face and work your way out squeezing slowly the MPDM bottle. Have a straight pin handy and pop out any air bubbles that arise. Let this dry for at least several hours. If you move it before it dries, the MPDM will run leaving your snowy face looking blurry.

4. Glue on a pin back or add some bakers twine and you're done!


Isn't she adorable?!? These make great ornaments, adorable pins, and would even look so cute embellishing a Christmas gift under the tree and best part - minus drying time, it takes less than 10 minutes!


Want to Check Out More Silhouette Projects?
My Silhouette Challenge buddies and I are all sharing projects on our blogs today, so peruse the projects below for a wealth of Silhouette inspiration! 


  1. 2013 Snowman Christmas Card by Please Excuse My Craftermath...
  2. Christmas Hoop Art by Lil' Mrs. Tori
  3. Silhouette Nativity Advent Candle Box by One Tough Mother
  4. Christmas Party Photo Booth Props by unOriginal Mom
  5. Another Stenciled Tea Towel by Cutesy Crafts
  6. Silhouette Gift Tags by Rain on a Tin Roof
  7. Snowflake Pin / Ornament by Coley's Corner
  8. State Sign Couple Gift by It Happens in a Blink
  9. Mason Jar Christmas Ornaments by Vintage News Junkie
  10. Merry Christmas Wall Decor by One Artsy Mama
  11. Deer Head Holiday Banner...featuring Santa's Reindeer by The Thinking Closet
  12. Restore your UGGS (with PAINT) by From Wine to Whine
  13. Monogrammed Snowflake Ornaments by Architecture of a Mom
  14. Christmas Countdown Sign by The Girl Creative
  15. Elf Chalk Sign: "The Best Way to Spread Christmas" by Weekend Craft
  16. Glittery Christmas Subway Art by The Turquoise Home
  17. Sketch Pen Labels by Sowdering About in Seattle
  18. Snowflake NOEL Sign by My Favorite Finds
  19. DIY Holiday Hostess Gift by Everyday Paper
  20. Folding Nativity Backdrop by Chicken Scratch NY
  21. Recycled Glass Jar Advent Calendar by Nearly Handmade
  22. Reindeer Card: Double-Sided Print & Cut by GetSilvered
  23. Personalized Block Ornament by Suburble
  24. Paper Medallion Christmas Tree by Create & Babble
  25. Mini Mid-Century Homes by Tried & True
  26. Glitter and Vinyl Minecraft Christmas Ornament by A Tossed Salad Life
  27. DIY Countdown to Christmas Refrigerator Style by My Paper Craze
  28. Reversible Recipe Holder/Block Frame by The Sensory Emporium
  29. DIY: Lettered Christmas Pillows by The House on Hillbrook
  30. Simply Charming Christmas Ornaments by Life After Laundry
  31. No Glitter was Worn by GiveMeAPaintbrush
  32. Make Easy Ornaments from Paper Circles by Bringing Creativity to Life
  33. Cutting Machine Embroidery Applique by Terri Johnson Creates
  34. "Believe" Christmas Banner by Daily Dwelling
  35. DIY Christmas Nativity Card by Pitter and Glink

    Do you have a Silhouette machine?
  36. Looking for Silhouette inspiration, support, trouble-shooting? Interested in joining us for our group posting event next month? Then, we'd love to have you join our Silhouette Challenge Facebook group. To join, simply fill out the new member request form, and Lauren from The Thinking Closet will get you squared away.


Monday, November 11, 2013

DIY Stenciled Mugs

Have you seen all the mugs that people post on Pinterest that are made with Sharpies? I always thought those were neat and have been wanting to give it a try. I'm not the best a freehanding an image, doodling, or writing on something like a mug so I used my Silhouette machine to create stencils! 

I read many different tutorials on how to do these. Some of them are pretty similar, but this is one that I liked best and referenced the most.

First you'll need two inexpensive mugs, permanent markers such as Sharpies or Bic Mark Its, and vinyl stencils of the images you want to put on your mug cut out with your Silhoutte machine. For this project, I chose to make use this mustache image and this lip image that were already in my library. I cut them out of black vinyl because that was what I had in my stash. The color really isn't important.

Wash your mugs really well with soap and water removing any price stickers. Let them dry then just before you go to start writing on the mug, wipe the area you will be writing on with alcohol. Place your stencil on the mug and press it down smoothly. If there is any area of your image that needs to remain white (like the middle part of the lips I used) be sure and place that down too.

Now you simply color in the image using your markers. I used a Red Sharpie and a Black Bic Mark It. I found the Black Bic Mark It worked much better and when I make mugs again, I will use all Bic Mark Its next time. Anyways, I found it easiest to out line the entire image being careful not to go outside the stencil and then fill it all in. I let them both sit for about 10 minutes before I removed my stencil. If you notice that the marker bled outside the stencil any, you can easily clean it up by dipping a Q-tip in alcohol.


I then put my mugs in a cool oven, turned the oven to 450 degrees and put the timer on 45 minutes. When the 45 minutes were up, I turned off the oven and left the mugs in until they cooled. The mustache mug looked amazing straight out of the oven but the color of the lips was more orange than red. So I added more red Sharpie to the mug and baked it all over again.

They turned out pretty cute! I washed them a couple of times just to be sure nothing scrubbed off and all was good.


With the holidays right around the corner, you could easily turn these into gifts for teachers, co-workers, friends, etc. by adding a couple of packages of hot cocoa and candy canes inside the mug, tie them with some pretty ribbon and add a jingle bell embellishment and you have a cute gift!


This post is part of the monthly Silhouette Challenges hosted by Lauren at The Thinking Closet

Check out other posts by Silhouette Challenge participants below: 

DIY Ironing Board Hanger by The Turquoise Home
Silhouette Challenge: Time Zone Bathroom Art by Nearly Handmade
Santa's Christmas Countdown by Tried & True
Nautical Anchor Pillow Tutorial by The Thinking Closet
Christmas Card Ornament with Free Cut File by unOriginalMom
Thanksgiving and Christmas Dual Sign by Architecture of a Mom
Itching to Etch by Get Silvered
Snowman Tag ~ Silhouette Challenge by Whats Next Ma
Thanksgiving Sign by Chicken Scratch NY
DIY Horse Silhouette Pillow by Rain on a Tin Roof
Sketching on Fabric by The Sensory Emporium
Paper Leaf Garland by Lil' Mrs. Tori
DIY Blessing Board - Silhouette Challenge by One Tough Mother
Christmas Pillow by Create & Babble
Glass Painting with Reverse Stencils by Givemeapaintbrush
Chalkboard Thankful Tree by Cutesy Crafts
Bottoms Up! MYO Wine Tag by From Wine to Whine
'Happy Holly-days' Tags for the Swap by An Elegant Touch...
Thank You for Dinner (Card) by Everyday Paper
Advent Star Christmas Countdown by My Favorite Finds
Geometric Fabric Bowls by Please Excuse My Craftermath...
Paper Carnival by Home At Eight
Silhouette Cameo Tutorial: Dual Sided Business Cards by Black and White Obsession
In Case of Emergency Baby Bag Tags by Tossed Salad Life
Christmas On My Mind by Creative Turn
Jingle all the Way! by My Paper Craze
Christmas Lights Garland by Making Home Base
We Are Thankful by 4 You With Love
Seattle Skyline Silhouette by Sowdering About in Seattle
DIY Stenciled Mugs by Coley's Corner

Interested in joining us for our group posting event next month?  We'd love to have you.  Simply fill out the new member request form, and Lauren from The Thinking Closet will get you squared away.


Friday, February 15, 2013

Owl Diaper Cake

You know I love owlies, right? 
So I just had to share this adorable owl diaper cake my BFF made for a baby shower. 

Isn't she a cutie! 

And she made a tutorial. Check it out in the video below!


(Linking to the parties listed in my sidebar)

Tuesday, November 13, 2012

No Sew T-Shirt Apron

I made my first t-shirt apron for myself awhile back. It's the teal and red one (that matches my kitchen!) pictured to the right that Noah's (former) PCA is so beautifully modeling.


Recently a friend asked me to make her one so I thought I'd take step by step photos to share it with you all. It's really not a hard project and it's pretty inexpensive but turns out so cute. It would make a perfect gift and an inexpensive group project for craft groups. 


Ok, let's get started. You will need:

  • A T-Shirt (You could recycle an old tee or watch for the craft stores to put them on half off and snatch up a few like I did.)
  • Fabric Glue
  • Ribbon (works best with wide ribbon at the top.)
  • Embellishments (The sky is the limit here! Rosettes, appliques, flowers, rhinestones, paint stencils, etc.)


Step 1
Cut off the t-shirt just below the armpits. Discard the top portion. 


Step 2
Fold over the top and pin it. I pin it mainly because it helps me make sure it is straight. Once it is all pinned, slowly take off the pins and glue down using the fabric glue. Then, so there isn't a messy edge showing, I fold it down once more and glue it down again. 


Step 3
Now you'll need to determine how much ribbon you'll need. I just loosely wrap the ribbon around my waist as a guide and use that.  Once I cut the ribbon, I folded it in half to find the half way point and I also fold the apron in half to find the half way point in it. Then I start gluing the half way point of the ribbon down onto the halfway point of the apron. This way you'll have even pieces hanging from each end. Continue gluing it all across the apron.

Lastly, I heat seal the ends of the ribbon with a lighter to prevent fraying.

Now your done with apron part and you get to do the fun part; embellishing!


I chose to freezer paper stencil a cupcake on this apron.  I just cut the cupcake out of freezer paper using my Silhouette machine and ironed it on. Then I painted it using acrylic paint mixed with textile medium. I painted the frosting chocolate and the cupcake liner pink. When it dried, I went back and added some pink dots for sprinkles and glued on a red rhinestone for the cherry. (Check out this link for an in depth tutorial on freezer paper stenciling.)


Adorable!  


(Linking up to the crafty parties listed in my sidebar)

Thursday, October 4, 2012

Glittery Candles made with Mod Podge


As I previously mentioned, a couple of weeks ago Plaid Crafts sent me a big box full of different Mod Podge goodies to create something for Halloween! Opening the box was a bit like Christmas morning!  After seeing all the goodies, I had so many ideas floating through my head and it was hard to narrow it down to one. Ultimately I decide to make some glittery candles with charms.

Want to know how to make your own glittery candles? Well, let me show you! 

Supplies needed: 


Black glitter
Battery operated pillar candles (I found mine at the Dollar Tree.)
Foam Brush
Mod Podge Acrylic Shapes (I used a circle charm and rectangle charm.)
Scrapbook paper
Letters (I cut mine out of cardstock using my Silhouette but you could always use sticker letters.)
Ribbon

Instructions:

1. Cover your workspace to protect it. This can be a bit messy! You'll also probably want to pour some of the Mod Podge into a container so you don't get black glitter all in your jar of Mod Podge.


2. Brush the sparkle Mod Podge onto your candle. 


3. Roll your candle in the glitter. If any spots are bare, just add a little more Mod Podge to those spots and then roll the candle in the glitter again. Be sure to do the top of the candle too.
4. Let your candles dry and then spray with the Mod Podge clear sealant. This keeps the glitter from falling off. 


5. To make the charms, trace the clear acrylic shapes onto the back of your scrapbook paper and cut them out. Brush Mod Podge onto the shape and then press down the scrapbook paper onto the shape making sure that it is smooth and there are no bubbles. Brush a tiny amount of Mod Podge onto the front of the shape where you want your letters to go.
6. Tie the ribbon around each of the candles threading the charm through as you tie the bow. 


7. Display your beautiful glitter candles!  

For more inspiration and ideas for Mod Podge projects, visit Plaid Crafts on FacebookTwitter, or Pinterest.

Disclosure: This post is part of a paid campaign with Plaid Crafts and Blueprint Social however all opinions in this post are my own.


;

Tuesday, September 25, 2012

Easy Card Making System

In today's technical era of texting and emailing, handmade cards mean so much to me. I know that the person who made the card put extra time and energy into making that card. I like making homemade cards so that the people I give the cards to will know the same.

But sometimes card making can be overwhelming! The new David Tutera Celebrate Card Making System makes card making as easy as 1-2-3!


Let me explain............

Step 1 is to choose a blank card. 
The cards come in a variety of sizes and colors. 

Step 2 is to choose a layer.
The layers are probably my favorite part of this line! They are amazing! Some of the layers are embossed, die cut, glittered, etc. 

Step 3 is to choose an embellishment or multiple embellishments. 
There are various color coordinated stickers, die cut, rhinestones, tags, etc. that compliment the layers and cards beautifully. 

So let me show you how I made my beautiful congratulations card.

I started with a blank card that has a little bit of shimmer and sheen to it. I chose to use 2 layers; the congratulations layer and then a sheen pink layer. I really love the shape of the congratulations layer. 
I cut the pink layer so that I would just have a little bit to show behind the word congratulations and then I adhered it to the congratulations layer using glue dots. 

I then centered the congratulations layer onto my card and adhered it to the card using glue dots. 

Next, I chose to use the "you're engaged" sticker and wanted to make the sticker pop by backing it with the same cardstock from the pink layer.
 So I cut a piece of cardstock from the layer that was slightly bigger than the sticker, stuck the sticker on the cut cardstock, and adhered it to the card using glue dots.

Lastly, I added two rhinestones to just to give it a little bling. 

And it's finished! Beautiful yet simple and classy! 

And making that card got me in the mood to do a little more card making! Here are a couple of more cards I made. 

Bundle of Joy Card


Fall Card
This card features a favorite fall photo of mine. I added the lacy layer on top of the photo.

I really enjoyed using the new David Tutera Celebrate Card Line. The quality of the cards, layers, and embellishments is outstanding.  While I focused solely on making cards in this post, you could also make a variety of paper crafts using items from this line like cupcake picks, bookmarks, tags, etc. 

This card line will be available for purchase at Jo-ann's Craft Stores very soon! 

For more information, you can follow the David Tutera Paper Crafts line on Facebook,Twitter and YouTube.


Would you like to win some of these goodies? Three lucky winners will receive a $250 grand prize pack of supplies from David Tutera’s Celebrate cardmaking line AND a personally signed book from David. Twenty additional winners will receive a $50 Celebrate prize pack! 
Sign up here for a chance to win.

This post was sponsored by the David Tutera Celebrate Card Line and Blueprint Social however all opinions are my own. 

Tuesday, September 11, 2012

Number Centerpiece

One of the things I made for my Mom's big 60th birthday bash was a wooden 60 centerpiece. I had originally planned on sitting it next to the cake but ended up using it on the entry table. It wasn't too terribly hard to make although I must warn you that the gluing steps will require extra patience. 

I think these would not only be great to have out at a child's or adult's birthday party but they would also make great table number pieces for weddings and cute decor for the 4th of July or New Year's Eve. 


To make your own you will need:
Wooden numbers (I got mine at Hobby Lobby.)
Round wooden plaque (also from Hobby Lobby)
Paint
Foam brush
Glue (I started off trying with wood glue but that wasn't holding so I switched to E-6000.)
Ribbon (optional)
Embellishments (optional)
Sanding Block


What you'll do: 
1. Sand your plaque and numbers a little bit if you think they need it. 
2. Paint your numbers and wooden plaque in the color(s) of your choosing. 
3. Once dry, glue one of your numbers to the plaque by liberally applying glue to the bottom of your number (do one at a time if using two numbers). Hold it down firmly in place for a few minutes. Let it completely dry before gluing on the other number.
4. Embellish away using ribbon, flowers, stickers, rhinestones, etc. 

And that's it! You now have a super cute number centerpiece!


(Linking to the parties listed in my sidebar)


Tuesday, August 28, 2012

Football Team Pride Wreath

Are you ready for some football? 
J and Noah are! And my front door is! 
I guess I am. I wrote last year about how I've come to enjoy football as an adult but mainly because of the social activities that football season brings. Well, let's add crafting to another reason of why I like football, hehe.


So, what better way to show guests exactly which team you root for than to greet them with a team pride wreath as they enter the front door?

It's easy peasy. Let's get started!

You will need:
wreath form
purple and orange yarn (or in your team colors)
wooden letters
football embellishment
glue (I used E-6000 but hot glue would work too.)
straight pins

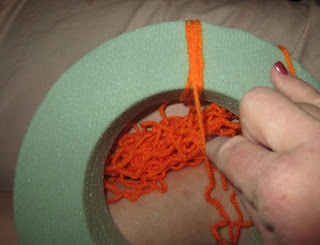
1. Begin by pinning one color of your yarn in a starting point on your wreath form and then wrap. I wrapped mine around 25 times then I cut the yarn, pinned it and switched colors, wrapped that 25 times and kept going that way until my wreath was completely wrapped.


2. Lay out your letters and figure out exactly where you want them to go and then glue them down.

3. Add your football embellishment with glue. Originally, I had planned to use one of the wooden footballs from Michael's but after two trips where they were out of them both times, I brainstormed for an alternative. I thought of just using a clip art football that I printed out but I wasn't sure how to make it weather proof until I stumbled upon this post at The Crafty Scientist where Mel used some Modge Podge Dimensional Magic on a printed image to help it withstand weather so that's what I did.

4. Cut some additional yarn to hang your wreath with. I just did about three loops of each color of yarn and then I double pinned them in the back to insure it holds up.

5. Hang on your front door and cheer your team on! 


(Linking to the parties listed in my sidebar)