Sunday, September 29, 2013

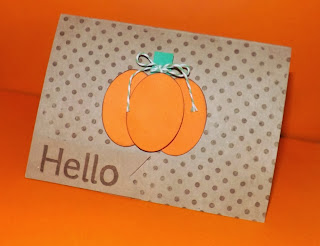
Oval Pumpkin Card


I created a very simple card. 


To create the pumpkin, I punched three ovals from orange cardstock. I inked the edges with brown ink and a sponge. Using regular adhesive I placed two of the ovals next to each other on a Kraft colored card based that was stamped with my Hero Arts polka dot background stamp. I then placed the third oval in between the two ovals using a pop dot to give it some dimension. I made a "stem" from green cardstock, tied some green baker's twine around it, and tucked in between the popped up oval. 


Simple and cute! 

Monday, September 9, 2013

Fall Decor with the Silhouette

I am so ready for fall! While it's still pretty warm outside, I recently took down the summer decor and am slowing putting out the fall. Maybe if I get ready for fall, Mother Nature will follow! 


I was a little bored with my fall decor so I decided to make a couple of new things and am sharing these cute fall luminaries with you today. 


These luminaries were super easy to make thanks to Silvia, my Silhouette machine and took less than 20 minutes. I started off with this file for autumn luminaries from the Silhouette store. I then cut it out of a rust and olive colored card stock. I put some vellum on the inside of the luminary where the leaves are cut out. Then I assembled my luminaries securing them with a strong adhesive, popped a battery operated candle inside, and was done! 


Super easy and cute on the mantle! 


This post is part of the monthly Silhouette Challenge hosted by Lauren at The Thinking Closet. To see more posts, check out the posts by some of my Challenge buddies below.

Organizing for Preschool by Life After Laundry
Stamped Wrapping Paper Tutorial by The Thinking Closet
Gender Reveal Fabric Banner by Create & Babble
Preschool Lovey Book by A Tossed Salad Life
Front Door Sign by Cutesy Crafts
Paper Pumpkin Banner by Chicken Scratch NY
A Stache Bash Shower by Home At Eight
Fall Decor with the Silhouette by Coley's Corner
Happy Fall Y'all by Tanya's Creative Space
Halloween Lights by Lil' Mrs. Tori
Customized Disney T-Shirts by DailyDwelling
Craft Room Labels by Super Sweet Life
Toddler Growth Chart by Joy and Gladness of Heart
"Let's Hear it For the Boys!" by An Elegant Touch

Tuesday, August 27, 2013

How Many Fingers are You Card


This week's CAS(E) this sketch was a simple but fun design. 


 I started thumbing through a 6 x 6 paper pad and found a paper that was blue and green and very masculine. I don't make many masculine cards at all so I thought I'd challenge myself and create a masculine card. 

And here's my finished card: 


I once again broke out my favorite stamp set, Friendly Advice Kids' Quotes by Inkadinkadoo . This is seriously my most used sentiment stamp set. I love it.

I stamped the sentiment. Added the banner using the same patterned paper I backed the card with and then added three green stars just to give it a little something extra. 


To see more cards using this sketch, head over to the CAS(E) this Sketch blog.

Friday, August 23, 2013

Snow Globe Card

This week's Festive Friday Theme Challenge is to create a card with a Children's Theme. That's a pretty big theme so I started thinking what I wanted to make. I started thinking of my Noah and the things he likes related to Christmas. (OK, so if you have read this blog long you know Noah likes ALL things related to Christmas!) But two things he really loves are snow globes (which he calls wish wishes) and reindeer. So I decided to make a reindeer snow globe card!


I cut a circle using a large circle punch and then stamped the reindeer from a Recollections set. I then masked the reindeer and stamped a Christmas tree from the same set. I colored them both in with my colored pencils. Then I cut a piece of light brown cardstock into a rectangle and rounded the corners of it to be the base for my snow globe. I adhered everything to my and stamped "Merry Christmas" in red from the same stamp set onto the base of the snow globe. Lastly, I added some clear Stickles to the tree and a red rhinestone to the reindeer's nose. 


I really love how it turned out!

To see more cute Children's Themed Holiday Projects, head over to the Festive Friday Blog!


Tuesday, August 20, 2013

First Day of School 2013

It's been a very long summer and I was very thankful for the start of school yesterday. Noah was excited to go however, he was not excited for my obligatory first day of school pictures so I did the best I could. 


Technically, he is in the 11th grade but because he goes to a special needs school he will stay in school until he turns 21. 


He had a great day but came home exhausted and hungry! LOL 

Sunday, August 11, 2013

(Less Than) 10 Minute Birthday Card

I recently came across a new challenge; the 10 Minute Craft Dash at Pretty Pink Posh. You are supposed to make a card pertaining to that week's theme in 10 minutes or less. I've never actually timed myself while making a card so I thought this would be a fun challenge though I discovered it is nerve racking to see that clock sitting there so I had to stop looking at it!

Here's my finished card.


Per the rules of the challenge, you can pull on all of your supplies that you think you might want to use before hand so I did that and I'm sure that saved me time. Per the rules, you can also draw a sketch before hand of how you think you want your card to turn out. I've never drawn my own sketch before but I went ahead and did that too.

I stamped the quote from one of my favorite stamp sets, Kids' Quotes by Inkadinkadoo in the middle of the card and filled in background in various colors to create "confetti" using two of the stamps from the Loves Me, Loves me Not set by Technique Tuesday.

I made this card in.


The bow kept giving me problems but in the end I love how the card turned out.


Friday, August 9, 2013

Birthday Cake Card

It's time for another CAS(E) this Sketch Challenge. This week's sketch is below. 


And here is my interpretation of the sketch.


I used a cake stamp from Recollections and colored it in using my colored pencils. I really love coloring in images - it's really therapeutic to me!


The Happy Birthday stamp is from the Birthday Princess Pure Innocence stamp set by My Favorite Things. I stamped it on a punched circle and then tucked the circle behind the mounted birthday cake image.


The card felt a little blah to me so I added brown ribbon and a cute little bow at the bottom.


I love how this card turned out. 

I'm also linking up to the Dessert CASology challenge

Tuesday, August 6, 2013

Flowers in a Jar and Birthday Balloons


I'm back participating in another CAS(E) this Sketch Challenge.
This week's sketch is below. 


And here are my interpretations of this week's sketch.


I created this first card using a Dear Lizzie jar stamp, a random flower stamp, and a sentiment from a Hero Arts sentiment set. I added some buttons to the centers of the flowers. I'm pretty happy with how it turned out.


I felt inspired by the sketch to make a second card and this is that card. I used some balloons from a Hero Arts birthday set. The balloons are actually attached to animals so I stamped them in different colors of ink matching the confetti in the background paper and then fussy cut all the balloons. I arranged them then drew black lines for the balloon strings with a black gel pen. I added a little orange pre-made bow and the Happy Birthday sentiment which is from the same Hero Arts birthday set.


If you'd like to see more cards made with this sketch, head on over to the CAS(E) Sketch blog.

Friday, July 26, 2013

Pink Joy Card

Today, I'm participating in my first Festive Friday challenge. Every other Friday they post a Christmas themed challenge in the efforts of helping to motivate card makers to have a jump start on the Christmas season. 


This week's challenge is a color challenge and the colors selected are pink, white, and silver. I'll admit that this was definitely a challenge for me as pink is not normally a color I would associate with Christmas. 


My card is very clean and simple. 

I used a background stamp to create silver polka dots on the card base. I die cut the letters and artisan square with my Silhouette machine. The ornament stamp is from Technique Tuesday and I heat embossed it in silver.


Simple but cute if you like pink for Christmas. ;)

For more pink, white, and silver Christmas inspiration head on over to the Festive Friday blog


Tuesday, July 23, 2013

Miss You and Smiley Face Card

It's time for another CAS(E) Sketch Challenge.
This is this week's sketch.


And here's my interpretation of that sketch.


The hearts are from a Love Elsie stamp set and the "miss you" is by Studio G.


I actually liked this sketch so much I used it to make a second card.

The smiley faces I just made using my circle punch, yellow cardstock, and a black gel pen. The stamp is from one of my favorite stamp sets, Friendly Advice, Kid's Quotes by Inkadinkadoo.


If you'd like to see more cards made with this sketch, head on over to the CAS(E) Sketch blog.

Monday, July 22, 2013

Quote of the Week: Just Breathe

"Sometimes the best thing you can do is not think, not wonder, not imagine, not obsess; just breathe and have faith that everything will work out for the best."
- Unknown

Tuesday, July 16, 2013

Celebrate Card


I'm participating in another sketch challenge over at the CAS(E) this Sketch blog. As you can tell, I'm enjoying playing along with this (new to me) weekly challenge. I like trying ideas that I wouldn't have necessarily come up with all on my own and with the craziness of summer, card crafting is really all I have the time (or energy!) for. 

This is this week's sketch.


And here is my interpretation of that sketch. 

I used a cute set by Hero Arts that I found on clearance at Hobby Lobby awhile back. It has some fun little birthday animals. I stamped the stamp, colored it in with colored pencils, and then cut it out with a circle punch. I stamped the word celebrate on yellow cardstock and banner cut it.


If you'd like to see more cards made with this sketch, head on over to the CAS(E) Sketch blog.