Around Coley's Corner

Tuesday, November 30, 2010

Easy but Cute Teacher Gift Idea

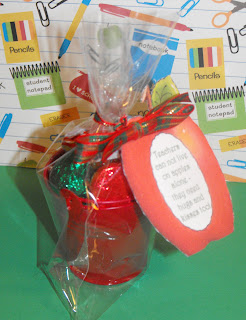
This is an easy little gift idea for your child's teachers. And if your child is like mine and has multiple teachers, you need something that doesn't break the bank and this is inexpensive but cute.


What you'll need:

  • White tin pail (I used the white mini pails you get in the wedding favor section three to a package at the Dollar Tree but I've also seen them at craft stores and WalMart in the wedding favor section.)
  • Red spray paint (I used Krylon cherry red.)
  • Hershey hugs and kisses
  • Clear cellophane bag
  • Ribbon
  • Tag (The tag reads, "Teachers can not live on apples alone - they need hugs and kisses too!) I'm sharing my apple shaped tag here
What you'll do:
1. Spray paint your little pails red. You could skip this step but I think it looks much cuter red. If you left them white, you could always doll them up with some school themed stickers or something. 
2. Fill the pail with the hugs and kisses.
3. Put the pail in the clear cello bag. Tie it closed with some ribbon and add the tag. 

Easy peasy!

Here's a few more pictures..... (I took a side and back view since it's kind of hard to see exactly what it looks like from the front with the tag.) 


Linking up to the following link parties:
Monday, November 29, 2010

Snowman Christmas Wreath

I needed a Christmas wreath for the door and loved my Halloween wreath so much that I created this one in a very similar fashion. 

What you'll need:
Wreath form (I got mine at The Dollar Tree making this an inexpensive project.)
Scrapbooking paper (I used 3 sheets.)
Glue stick
Coordinating ribbon
Ornament (I knew I wanted the wreath to have a jingle bell on it and when I spotted the little snowman jingle bell ornament at Michael's on 50 % off I opted to go with it instead of a plain jingle bell.) 
Ribbon
Hot glue gun

What to do:
1. Cut your scrapbook paper in to strips. Mine are about 1 inch wide.
2. Wrap your strips around your wreath form and secure them in the back of your wreath using your glue stick. If you find this isn't strong enough, you could use hot glue or even tape but it worked fine for me.
3. Continue to wrap your strips all the way around the wreath form overlapping them as you go.
4. Make a bow with your ribbon and glue it on using your glue gun. I added a simple snowflake embellishment to the middle of the red bow. 
6. Add your ornament to the wreath and secure it with  hot glue in the back of the wreath.
7. Hang it on your door to greet all your holiday guests!

Sunday, November 28, 2010

Ribbon Loopy Trees

I hope you all had a great Thanksgiving. I spent some of the time after Thanksgiving working on Christmas crafts so I can get my decorations up. I'll be sharing some of those crafts with you over the next few days.


I've been wanting to make one of these ribbon loopy trees for awhile and last week Michael's had all of their Christmas ribbon on sale for 50 % off (which made them 1.00 a spool) so I took it as a sign that I was destined to craft out one of these little trees. It was much easier than I thought it would be.


All you need is ribbon (I bought six spools for the first tree and had some leftover), straight pins, scissors, a styrofoam cone, cardstock, a toothpick, and glue.


Cut your ribbon into 3 inch strips. (I find it easier to cut a bunch of strips first.) Grab a strip, fold it in half, and starting at the bottom of the foam cone attach the looped ribbon with a straight pin. I started off by attaching them with just one straight pin but noticed that the loops were tilting so I started using two straight pins - one on each side of each loop of ribbon and this worked much better. Go all around the cone and do one "level" and when you've completed that level, go up a bit and start another one. Vary your ribbons as you like and just keep working your way up the cone.


Then to create the little star topper, I just cut out two red stars and two smaller white stars using my Slice machine. Then I glued the red stars to each other with a toothpick in the middle. I glued the white stars on to each red star and stuck the toothpick in the very top of the cone. I tied a small bow as a finishing touch.


This project took me about an hour - it's a great project to keep your hands busy while watching TV.


I showed my Mom the first ribbon tree and she asked that I make her one and I was more than happy to oblige and made hers in more traditional red and green.


That's what I love about these - you can make them traditional, modern, fun, whimsical, or however you want just by varying the types and colors of ribbons you use.


Quote of the Week: Life is Like a Camera

"Life is like a camera, it's what you focus on that will develop." 
- Unknown

Thursday, November 25, 2010

You were Made for This Thanksgiving Style


Happy Thanksgiving!

 Click here to find out the story behind my mantra, "You were Made for This." 

Click here to see more of my "You were Made for This" photo series. 

Wednesday, November 24, 2010

Wordless Wednesday: Checking on the Turkey

Noah is so excited that we are hosting Thanskgiving at our new house for the first time. He has gone to the fridge repeatedly to look at the turkey. He doesn't even really care for turkey all that much but he knows it's a part of Thanskgiving. 

Have a blessed Thanksgiving everyone!! 


For more Wordless Wednesday check out 5 Minutes for Moms and Special Exposure Wednesday at 5 Minutes for Special Needs

Monday, November 22, 2010

Christmas Counterdowner

I made this super simple Christmas Counterdowner (they call it a "counterdowner" on a Christmas video Noah enjoys watching over and over and over and over) using a cheap, plastic frame as I figured this might be something Noah would want to help with and he'd do better with a plastic frame versus glass. 


I made the image inside the frame in PSP and printed it out. I left a space big enough to write in the numbers with a dry erase marker. You can download the image here. It's for a 5 x 7 picture frame. 


So easy I don't know if I should even call it a craft or not. Wait, I did use scissors to cut it out so that counts, right!


Sunday, November 21, 2010

Quote of the Week: Live by Them

"As we express our gratitude, we must never forget that the highest appreciation is not to utter words, but to live by them."  
~John Fitzgerald Kennedy

Saturday, November 20, 2010

Update on Noah's Behavior and Meltdowns

Well we have adjusted Noah's medicine twice and added a new one into the mix since I posted about his meltdowns almost a month ago. We have noticed  a huge change in Noah - a good, for the better change! I think the latest medication adjustment has done the trick. He seems much more like his old self. He's being silly again and is content to just play again. His repetitious behaviors have also calmed down somewhat. (He's always going to have them but they aren't at all time high as they were a month ago.) 


His teacher has also noted a change in his behavior. She sent home a note this week saying that he has had a really good week and earned extra school store money for his excellent behavior in music class. She also said that he seems much happier and content. 


So here's hoping things stay that way for a little while! 

Friday, November 19, 2010

You Were Made for This Fridge Reminder

Recently I was feeling nervous about something and my sweet hubby was reassuring me and told me, "You were made for this." 

He then wrote this little reminder on the dry erase board that hangs on our fridge. 


 Click here to find out the story behind my mantra, "You were Made for This."

Click here to see more of my "You were Made for This" photo series. 

Thursday, November 18, 2010

The Cell Phone Bandit

Now that we live in a one story house, Noah is in his wheelchair a lot more than before. I think he enjoys the freedom of being able to wheel wherever he wants to go. There is one slight problem though...... 

 He is now able to easily reach my phone almost all the time. Since I am short vertically challenged there are few places that I can reach (I think I'd have to put it on the top bookshelf!) that he can't reach without a little stretching. 

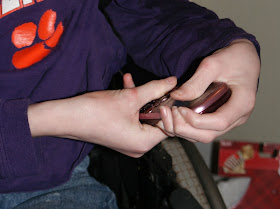
So, he often grabs my phone and starts punching buttons and trying to call Nana or Uncle Andy or whomever he has in his head that he wants to call at that moment. But he really doesn't know what he is doing and pushes buttons and ends up calling someone or even texting someone! So, if your name is in my cell phone address book and you get a phone call from me where I'm not saying anything - it's probably Noah! And if you get a really random text from me - that's probably Noah too. 


PS. Yes, my phone has a lock feature and yes, Mr. Smarty has figured out how to un-do it!


Wednesday, November 17, 2010

Wordless Wednesday: Sock Monkey Jammies

Noah loves his sock monkey jammies. Sometimes when he is wearing them I'll notice him look down at his arm and smile at the monkeys. So sweet!


Tuesday, November 16, 2010

Chalkboard Ornaments

So lately I have been seeing so many cute different chalkboard ideas (using chalkboard paint) all over the crafty blogs. I bought some chalkboard paint thinking I wanted to give it a whirl. Then I started thinking about Christmas and thought a chalkboard ornament would be adorable. You could use it as an ornament and write the person's name or short message on it, use it as a gift tag on a present, or use it as a place card/favor at a holiday dinner or party. 


I started playing around and here's what I came up with! 


Pretty cute, huh? And not too hard. :)


What you'll need: 
Cardboard coasters - I used some thick cardboard coasters I got at Michael's on clearance for 25 cents for a package of 8. You could also used a thick piece of cardboard you cut into a circle or a thin piece of wood. 
Decorative scrapbook paper
Adhesive of your choice
Stickers/buttons/embellishments
Think chipboard or cardboard
Chalkboard paint
Foam Brush
Hole punch
Ribbon
Chalk


What you'll do: 
1. Flip your decorative piece of scrapbook paper over and trace your coaster on to it. Cut it out and adhere it to your coaster. Sand any edges that may need sanding. 
2. Cut a slightly smaller circle out from your cardboard or chipboard. I used my 2 inch circle punch and I punched that circle out of cardboard from a cereal box I was about to throw away. (Yay, for being green!) 
3. Paint your smaller circle with the chalkboard paint according to the directions on the bottle. (I painted the circle using horizontal strokes with the foam brush, let it dry an hour, painted vertical strokes, and then let it dry overnight. When dry, mark on your circle with chalk to "condition" it, then wipe off the chalk and you should be good to go.)
4. Adhere your chalkboard circle to the middle of your larger circle. 
5. Embellish with stickers, buttons, or whatever you like!
6. Punch a hole in the middle of the top of the ornament and thread some coordinating ribbon through so you can hang your ornament. 


And your done. Hang and admire or give them away!! 


Sunday, November 14, 2010

Quote of the Week:God in Control

"In the ever changing circumstances of life,
there is a faithful never changing God in control." 

~ Unknown

Saturday, November 13, 2010

My Thanksgiving Mantel

I finished my Thanksgiving mantel last week but I kept forgetting to take and post pictures! I'm pretty happy with how it turned out. 


 Close up of the left side of the mantel which includes the "thankful for" frame and one of the newsprint decorations.


 Close up of the right side of the mantel which includes another of the newsprint decorations and a cornucopia basket filled with leaves and mini pumpkins.

The candle holders you see on either end of the mantel are just cheap candlesticks and candle holders from the Dollar Store. I spray painted the candlesticks brown and then glued the candlestick and the candle holder together and added a bow when dry.
This is the Subway art that is hanging above the mantel. It was super easy to make using a free printable from Just Another Hang Up. I just printed the file on cardstock, cut it out, and then adhered it to an old wooden plaque I had covered with cardstock. 

And that's the Thanksgiving mantel. :)


Linking up to the following link parties:

Thursday, November 11, 2010

You Were Made for This Ransom Style


 Click here to find out the story behind my mantra, "You were Made for This."

Click here to see more of my "You were Made for This" photo series. 

Wednesday, November 10, 2010

Wordless Wednesday: Snap, Crackle, Pop

I love it when Noah eats Rice Krispies....

 He puts his head down near the bowl so he can hear the snapping, crackling, and popping and he giggles.
I love his innocence.


For more Wordless Wednesday check out 5 Minutes for Moms and Special Exposure Wednesday at 5 Minutes for Special Needs.

Tuesday, November 9, 2010

Thankful For Frame

This is another craft I whipped up for my Thanksgiving mantel. I thought creating a frame where we could write something we are thankful for each day would be fun. I simply used a frame from The Dollar Store and I had everything else on hand making this an extremely inexpensive project. 

Items Needed:
Frame
Paint (optional)
Scrapbook Paper (One printed sheet and one solid colored coordinating sheet)
Ribbon
Dry Erase Marker

What You'll Do:
1. Take your frame a part and paint if desired. I painted my frame green. You could skip this step though and leave the frame plain or buy one already painted. 
2. Adhere your printed scrapbook paper to the back of the cardboard that comes with the frame. Reassemble your frame. 
3. Cut letters out of plain scrapbook paper using a personal die cut machine to spell out "Thankful For". I used my slice. You could also use stickers if you don't have a die cutting machine. Adhere the letters to the frame. 
4. Tie some ribbon to the dry erase marker and then glue it to the back of the frame. 
5. Write what you are thankful for, erase it, and write something else! 


Linking up to the following link parties:

Monday, November 8, 2010

Thanksgiving "Newsprint" and a Banner

A couple of people have asked if I would share the file I created to make the newsprint I used in my Thanksgiving Newsprint Decorations. So I saved the file as a PDF and it is available for download here. I should note that the text for the file came from here.


I also created a banner using the newsprint. It was easy and quick to make.


I just followed these simple steps.
1. Using a ruler and pencil create a triangle in your desired size on a piece of card stock. Cut out your triangle out to create a stencil.
2. Print multiple copies of your "newsprint" onto card stock.  The size of your triangles will dictate the number of sheets you'll need to print. I was able to cut two triangles out of one sheet.
3. Trace and cut out 10 triangles from your newsprint. You could tea stain your newsprint for a more antique look. I did that for my framed decorations but opted not to do that for this banner.
4. Adhere letters to your newsprint triangles. I cut them out using my Slice machine but if you don't have a personal cutter you could always use sticker letters.
5. Adhere the triangles to ribbon and hang your banner!


Linking up to the following link parties: